

Construction work is exciting, but it’s often a death sentence for your landscape.
You’ve spent years admiring the mature Oak in your backyard or the Maple shading your driveway. Now, you are planning a home addition, a new driveway, or researching the best types of pool resurfacing for your new backyard oasis. You envision the finished project with your beautiful trees framing the new structure perfectly.
Here is the harsh reality: Without a specific protection plan, those trees will likely die.
It rarely happens immediately. Construction damage acts like a slow poison. Soil compaction from heavy machinery, severed roots, and trunk damage can send a tree into a stress spiral that kills it 3 to 5 years after your contractors have left. By the time the leaves turn brown, it is too late to save them. You are left with a stump and a depreciation in property value.
But this is preventable.
With the right strategy, you can renovate your home and keep your canopy intact. In this guide, I will walk you through the arborist-approved steps to shield your trees from bulldozers, backhoes, and boots.
- How to Protect Trees During Construction
- The "Silent Killer": Understanding How Construction Damages Trees
- Step 1: Calculate the Critical Root Zone (CRZ)
- Step 2: Establish the Tree Protection Zone (TPZ)
- Step 3: Managing Soil Compaction & Excavation
- Step 4: The "Contractor Talk" (Crucial for Success)
- Post-Construction Tree Care
- Conclusion: Prevention is Cheaper than Replacement
- FAQs
How to Protect Trees During Construction
To protect trees during construction, follow these core steps:
- Mark the Critical Root Zone (CRZ): Measure the trunk diameter (DBH) and multiply by 12 to find the protection radius.
- Install Rigid Fencing: Use chain-link fencing, not plastic tape, to create a physical barrier around the CRZ.
- Prevent Soil Compaction: Apply a 6-12 inch layer of wood chips or use plywood mats over areas where machinery must drive.
- Manage Excavation: Use air spades or hydro-excavation to expose roots safely rather than ripping them with backhoes.
Hydrate: Water trees deeply before and during the construction phase to reduce stress.
The “Silent Killer”: Understanding How Construction Damages Trees
Most homeowners believe that if they don’t hit the tree trunk, the tree is safe. This is a dangerous misconception.
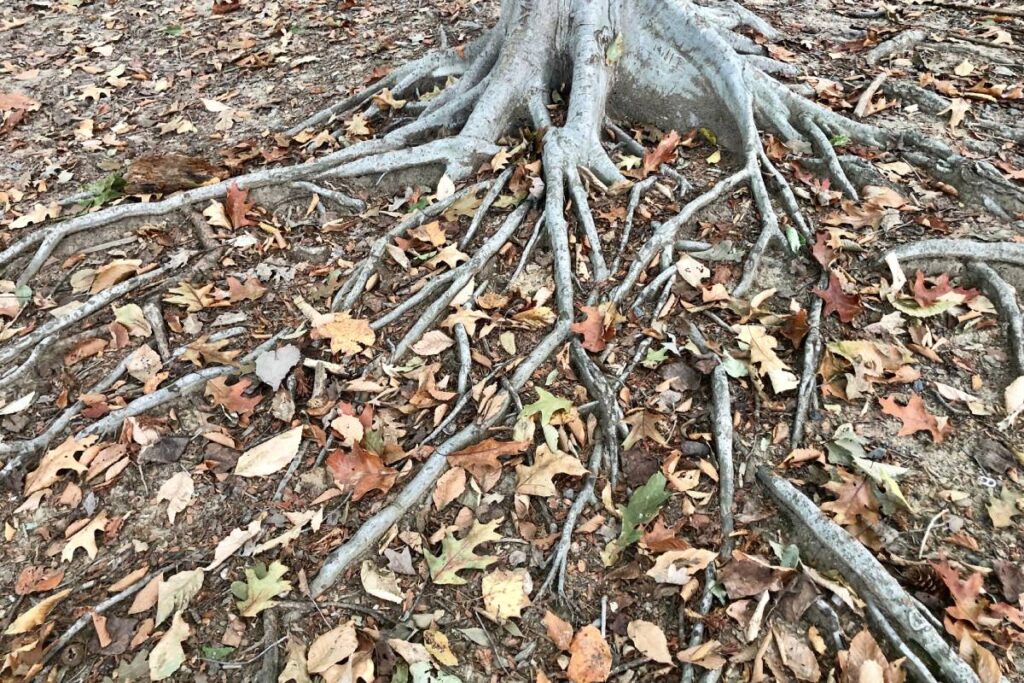
90% of a tree’s root system lies in the top 18 inches of soil.
Roots do not mirror the canopy deep underground; they spread out widely and shallowly, often extending two to three times further than the branches. These feeder roots are responsible for absorbing water and nutrients.
When a 20-ton concrete truck drives over this area, two things happen:
- Soil Compaction: The soil particles are squished together, eliminating the air pockets that roots need to breathe.
- Root Crushing: The delicate feeder roots are physically destroyed.
If you don’t protect the soil, you suffocate the tree.
Step 1: Calculate the Critical Root Zone (CRZ)
Before you hammer a single nail, you need to do some math. You need to identify the Critical Root Zone (CRZ). This is the “no-go” zone where absolutely no disturbance should occur.
The Formula: 1 Inch = 1 Foot
Arborists use the “Diameter at Breast Height” (DBH) method to calculate this zone.
- Measure the diameter of the tree trunk at 4.5 feet off the ground.
- For every 1 inch of trunk diameter, you need 1 foot of radius protection.
Example: If you have a mature Oak tree with a 20-inch diameter trunk:
- Calculation: 20 inches x 1.5 ft (for older trees) or 1 ft (for younger trees).
- Protection Radius: You should protect a circle with a radius of 20 to 30 feet from the trunk.
Pro Tip: If you cannot protect the full CRZ, aim to protect at least 70% of it. If you impact more than 30% of the roots, the tree’s survival chances drop precipitously.
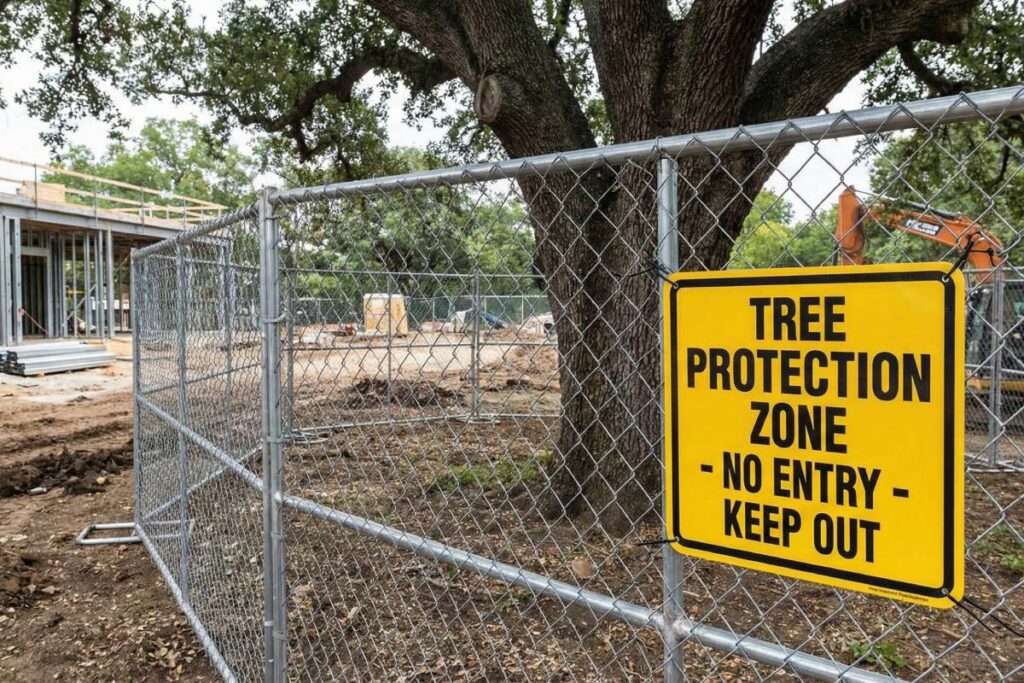
Step 2: Establish the Tree Protection Zone (TPZ)
Once you have calculated the CRZ, you need to make it visible. This area is now the Tree Protection Zone (TPZ).
Do not use plastic caution tape. Plastic tape flutters in the wind and gets ignored. Contractors will duck under it to store bags of cement or park their trucks in the shade.
The Gold Standard: Chain Link Fencing
You need a physical barrier that says “Keep Out.”
- Material: Install a 4-to-6-foot high chain-link fence or sturdy wire mesh fencing.
- Placement: Place it at the edge of the calculated CRZ.
- Signage: Zip-tie distinct, waterproof signs to the fence every 20 feet that read: “TREE PROTECTION ZONE – NO ENTRY – NO STORAGE.”
Step 3: Managing Soil Compaction & Excavation
Sometimes, space is tight. You might need to move machinery past a tree where you cannot erect a full fence. In these cases, you must buffer the ground to prevent compaction.
The Buffer Method
If heavy equipment must cross the root zone, create a temporary road:
- Wood Chips: Spread a layer of wood chips 6 to 12 inches thick over the path. This disperses the weight of the vehicle.
- Plywood/Mats: Place ¾-inch plywood or specialized AlturnaMATS on top of the mulch.
Root Pruning vs. Ripping
If excavation is required near the tree, you need surgical precision, not brute force:
- Never allow a backhoe to rip roots. This shatters the root back to the trunk, inviting disease and instability.
- Use an Air Spade: Hire a professional to use an air spade (compressed air) to blow soil away and expose roots safely.
- Clean Cuts: If a root must be cut, it should be severed cleanly with a sharp saw, not torn. For high-stakes excavation near mature trees, we recommend engaging specialists like Wiktora Bros Tree Lopping to handle the root pruning. Their expertise ensures the cuts are made at the correct node, preventing decay from spreading to the main trunk.
Step 4: The “Contractor Talk” (Crucial for Success)
You can have the best plan in the world, but it will fail if your general contractor (GC) isn’t on board.
You must shift the dynamic. You are not just asking them to be careful; you are making it a condition of employment.
The Tree Protection Clause
Include a clause in your contract regarding tree damage.
- The Walkthrough: Before work begins, walk the site with the site supervisor. Point out the TPZ fences.
- The Penalty: State clearly that damage to the trees or violation of the TPZ (e.g., washing concrete brushes near the trunk) will result in a financial penalty or work stoppage.
- Designate Storage: Explicitly mark where materials, porta-potties, and debris dumpsters go. Ensure this is far away from your trees.
Explicitly mark where materials, porta-potties, and debris dumpsters go. Ensure this is far away from your trees. If space is tight, consider using external self-storage solutions to keep non-essential materials off-site and out of the Critical Root Zone.
Many contractors will tell you, “Don’t worry, we build near trees all the time.” Be skeptical. Stand firm on your fencing and boundaries.
Post-Construction Tree Care
Once the dust settles and the trucks leave, your trees will be tired. Even with protection, the vibration and dust cause stress.
- Deep Watering: This is the most critical step. Construction often lowers the water table or diverts runoff. Ensure your tree gets 1 inch of water per week.
- Aeration: If you suspect soil compaction occurred, hire an arborist to perform vertical mulching or aeration.
Hold off on Nitrogen: Do not heavily fertilize a stressed tree immediately with high nitrogen. It forces new growth that the compromised root system cannot support.
Conclusion: Prevention is Cheaper than Replacement
Protecting trees during construction requires effort, assertiveness, and a bit of budget. But when the scaffolding comes down, and you see your new home nestled under the canopy of a healthy, ancient Oak, you will know it was worth it.
Don’t let your renovation destroy your landscape. Take control of the site, enforce the boundaries, and give your trees the respect they deserve.
Are you planning a renovation near mature trees? What is your biggest concern regarding the excavation process? Let me know in the comments below.


